Games
/Entertainment

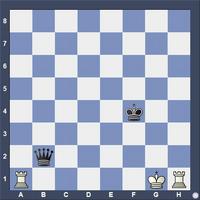
White to Play
White has to try and draw here. He can’t win, but he can lose as there is only one move to initiate the drawing process.
View solution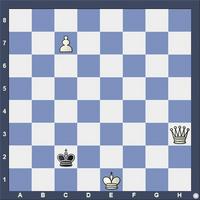
White to Play
A mate in three to challenge you. It’s tricky. Watch out for stalemate possibilities.
View solution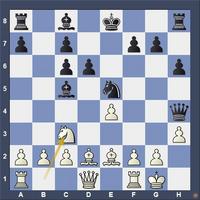
Black to Play
A very instructive game of how to attack in a normal looking position. From Dehen-Malle Dortmund, 1964. The game started with 1.e4 e5 2.Nf3 Nc6 3.d4 exd4 4.Nxd4 Nf6 5.Nxc6 bxc6 6.Bd3 Bc5 7.0–0 d6 8.Bg5 h6 9.Bd2 Ng4 10.h3 Ne5 11.Be2 Qh4 12.Nc3 AND NOW WE REACH THE DIAGRAMMED POSITION
View solution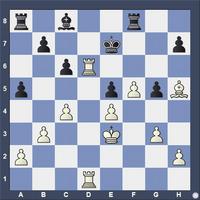
White to Play
A prime example of mobile pieces placed actively vs. immobile pieces placed passively.
View solution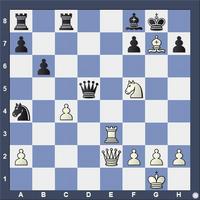
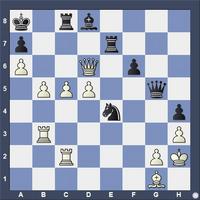
White to Play
A brief look at the position will reveal why you as White can’t take the black queen, so what can you do?
View solution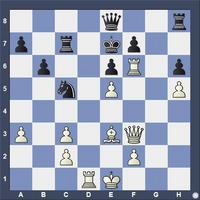
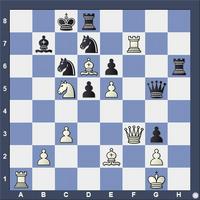
White to Play
A Fischer mate from the Siegen Olympiad in 1970 against Bill Hook of the Virgin Islands.
View solution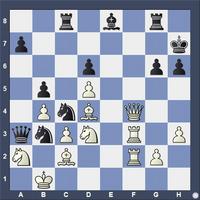
White or Black to Play
No matter whose move it is, the person on the move wins. A two for one special!
View solution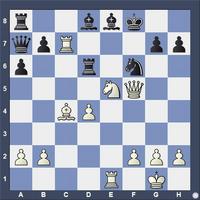
White to Play
We’re taking off from where we left off with the solution in our last puzzle. How did Levenfish finish the game? All moves except one lose! And he saw all this from where we started out in the last puzzle.
View solution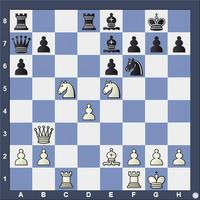
White to Play
I was honored to have my book, Openings for Amateurs: Theory vs. Practice, awarded Book of the Year (instructional category) by the Chess Journalists of America in their 2025 awards. It is the third book of a trilogy I have written, aimed at the average player who wishes to significantly improve. I’m taking a position from one of the model ...
View solution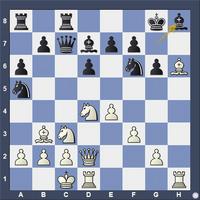
White to Play
Today we have a real challenge for you. White has an attacking position. That should be clear. The question is what is the best way to proceed? The game started with a Dragon Sicilian 1.e4 c5 2.Nf3 g6 3.d4 cxd4 4.Nxd4 Nf6 5.Nc3 Nc6 6.Be3 Bg7 7.Bc4 0–0 8.Bb3 d6? (Too slow. Black has to play the thematic equalizing move 8...d5!)9.f3 a6? (Again, ...
View solution
White to Play
Some attacking positions have more than one way to win. Back in 1943, Smyslov won a nice game vs. Kotov. Later, in analysis this possibility arose in this position. Smyslov,as befitting a future world champion, found the best first move, although he deviated from the possibility we give here. It’s just a fun position to see all the ...
View solution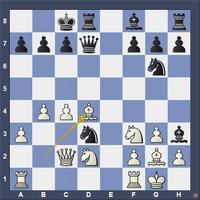
Black to Play
The Albin Counter Gambit to the Queen’s Gambit usually signals a wild and wooly fight. This game is no exception. Both players start out well. Then their move choices get interesting and even critical: 1.d4 d5 2.c4 e5 3.dxe5 d4 4.Nf3 Nc6 5.Nbd2 Be6 6.a3 Nge7 7.g3 Qd7 8.Bg2 Ng6 9.Qc2 0–0–0 10.b4 Ncxe5 11.0–0 d3?! 12.exd3 Nxd3? 13.Bb2 Bh3 ...
View solution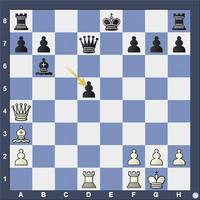
White to Play
Today is a real lesson game. There are two big lessons courtesy of the Evans Gambit. The first one is the devastating effect of a Ba3 move that stops Black from castling. The second one is the use of using center pawns to open lines to expose the opponent’s king. This is one of the reasons the Evans is still very popular in amateur play. ...
View solution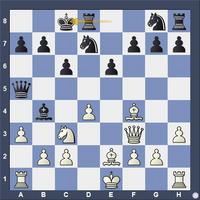
White to Play
The Scandinavian Defense is often misplayed by amateurs. This game is one example: 1.e4 d5 2.exd5 Qxd5 3.Nc3 Qa5 4.d4 c6 5.Nf3 Bg4 6.Bf4 e6 7.h3 Bxf3 (Moving the bishop back to f5 or h5 just gets g4 as a reply. For example, 7...Bh5 8.g4 Bg6 9.h4 Nd7 10.h5 Be4 11.Bd2 Bxf3 12.Qxf3 h6 and White gets the exchange anyhow, but with 4 extra moves and ...
View solution
White to Play
This game is a fine lesson in why players castle before they attack. Black thought he would cower White with his g5 pawn attack on the kingside. If you were White, how would you show Black why it wasn’t such a good idea. The game started 1.e4 e5 2.Nf3 d6 3.d4 Nf6 4.Nc3 Nbd7 5.Be2 Be7 6.0–0 h6 7.b3 c6 8.Bb2 Qc7 9.Qd2 g5 10.Rfd1 Nf8 11.dxe5 ...
View solution
Black to Play
One careless move in the opening can sometimes lead to disaster. This game is an object lesson on what not to do. From Sczepaniak-Michel, Berlin 1939—It starts out 1.d4 d5 2.Nf3 Nf6 3.c4 c5 4.Nc3?? cxd4 5.Nxd4 e5 6.Nf3 d4 7.Nb1 Nc6 8.g3 e4 9.Nh4 g5 10.Ng2 Ng4 11.h3 Nge5 12.b3 Bf5 13.a4 Bb4+ 14.Bd2 Qd6 15.a5 and now it’s time for you to ...
View solution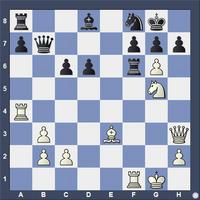
White to Play or Black to Play
Today we have another two for one special. Whoever has the move in the position gets to mate the opponent.
View solution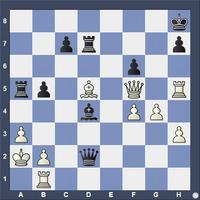
White to Play or Black to Play
Today we have a two for one special. Whoever has the move in the position gets to mate the opponent.
View solutionRelated Channels
Comics